
Introduction :
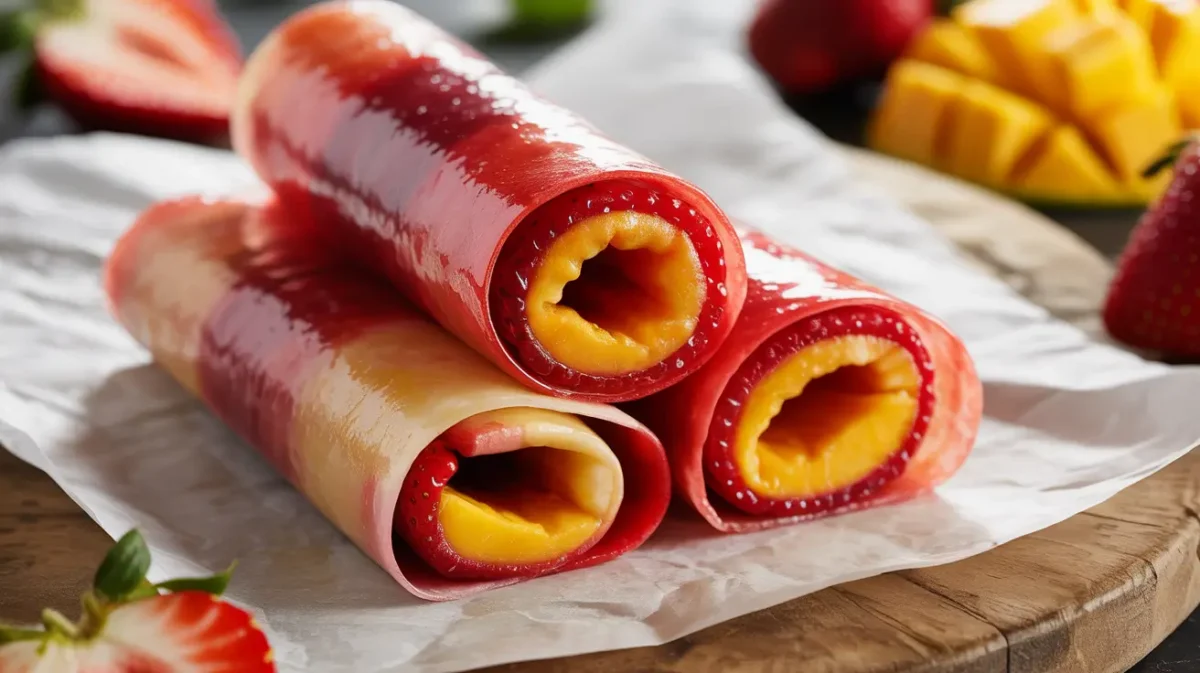
Homemade fruit roll-ups soft, chewy, and bursting with the natural sweetness of ripe summer fruit—are the kind of snack that takes you straight back to childhood. Imagine the aroma of fresh strawberries and mangoes filling your kitchen, transforming into glossy, perfectly bendable sheets of fruity goodness. I’m Chef Ruby, your culinary companion, and today we’re making these irresistible homemade fruit roll-ups the way they were meant to be healthy, no-sugar-added, and 100% real fruit.
Why settle for store-bought when you can create a version that’s fresher, cleaner, and every bit as delicious? In this guide, I’ll show you how to master the perfect texture, choose the best fruit combinations, and store your snacks so they stay chewy for weeks. Whether you’re a parent searching for better snacks for your kids or simply craving a nostalgic treat, this recipe is your new favorite kitchen adventure.
Learn more about real fruit snacks for kids and discover fun, healthy alternatives your whole family will love.
table of contents
Table of Contents
Why Make Homemade Fruit Roll-Ups Yourself
Ever looked at a pack of store-bought fruit roll-ups and wondered how much real fruit they actually contain? Most are packed with added sugars, artificial colors, and preservatives that hide the true essence of fruit. Making homemade fruit roll-ups means you’re in charge—no mystery ingredients, no chemicals, just pure, vibrant fruit.
The beauty of crafting them yourself lies in their nutritional advantage. Homemade versions retain essential vitamins, minerals, and natural fiber that your body actually needs. Fresh fruits like strawberries, mangoes, or apples bring antioxidants and nutrients that help boost energy and immune function. You can completely skip refined sugars by letting the natural sweetness of ripe fruit shine through. The outcome is a chewy, fruity delight that tastes like summer and fuels your day the healthy way.
Another major perk is total texture control. Store-bought roll-ups often feel rubbery or overly sticky. Homemade ones let you fine-tune the chewiness—keep them soft for kids or slightly firmer for travel snacks. That flexibility lets you tailor each batch exactly how you want it.
And of course, there’s the flavor creativity. You can blend strawberries with bananas, or mix mango and pineapple for a tropical twist. The combinations are endless, and every batch feels fresh and exciting. Once you experience the real taste of homemade fruit roll-ups, you’ll never reach for the processed version again. It’s cleaner, tastier, and simply more rewarding.
Discover great ideas like healthy fruit snacks recipes to inspire your next batch of homemade treats.
The Science Behind Perfect Fruit Roll-Ups
Every perfect homemade fruit roll-up is a tiny piece of food science magic. To transform fruit puree into that flexible, chewy texture, you need a careful balance of natural sugars, pectin, and gentle dehydration. Understanding how each element works is what separates a sticky mess from a beautifully smooth and glossy roll.
Let’s start with dehydration. When you spread your blended fruit puree thinly and heat it slowly at low temperatures (typically 150–175°F or 65–80°C), the water evaporates without cooking the fruit. This slow drying process locks in the flavor, preserves color, and maintains essential nutrients. The key is patience—rush it, and your roll-up becomes brittle or unevenly dried.
Next comes pectin, the natural fiber found in most fruits. Pectin is what gives fruit roll-ups their bend and bounce. High-pectin fruits like apples, plums, and berries naturally thicken as they dry, creating that soft chew we love. If your fruit mix is low in pectin—like mango or peach—adding a little lemon juice can boost the structure and help it hold together.
Sugar also plays a major role. Natural fruit sugars caramelize slightly as they dry, giving your roll-up a shiny finish and a more stable texture. Too little sugar and your snack might crack; too much, and it’ll turn sticky. The perfect batch hits that balance of sweet, pliable, and lightly tacky.
Remember, texture perfection is all about moisture balance. The ideal homemade fruit roll-up should feel dry to the touch but still flexible—slightly tacky yet smooth. When you bend it, it shouldn’t crack or tear. This is the hallmark of a roll-up made with precision, patience, and just the right touch of science.
Li, L., Wang, B., Wang, Y. et al. Effect of drying methods on the characterisation of pectin extracted from dried hawthorn fruit. Journal of Food Measurement and Characterization, 2022. → étude comparant la viscosité, la teneur en pectine et la texture selon les méthodes de séchage. (link.springer.com)
Choosing Fruits for Roll-Ups
The secret to irresistible homemade fruit roll-ups lies in the fruit you choose. The flavor, texture, and even drying time all depend on the natural sugar and water content of your ingredients. Picking the right combination ensures that your roll-ups come out vibrant, flavorful, and perfectly chewy every time.
Best Fruits for Homemade Roll-Ups
When it comes to making fruit roll-ups, not all fruits behave the same way. Fruits like strawberries, mangoes, apples, apricots, and plums are top choices because they offer the perfect balance of sweetness and pectin. Strawberries and mangoes give that bright, tropical burst of flavor, while apples and plums provide natural structure and flexibility. Apples, in particular, are high in pectin, which helps the roll-ups firm up beautifully without needing added stabilizers.
Flavor Pairing Ideas
Experimenting with flavor is where homemade roll-ups truly shine. Combine mango and pineapple for a tropical twist, strawberry and banana for a creamy sweetness, or blueberry and apple for a rich, tangy balance. You can also create layered roll-ups by pouring two different fruit purees side by side—this not only looks beautiful but also gives every bite a fun flavor surprise.
Sugar-Free Variants
If you’re aiming for a no-sugar-added version, use fruits that are naturally sweet and smooth. Ripe bananas, dates, and pears are great options. They act as natural binders, adding both sweetness and texture. You can also include a touch of lemon juice to brighten flavors and balance out the natural sugars.
Check out our fruit for snacks guide for more ideas on using different fruits creatively in your kitchen, and explore fresh inspiration from High Tasty for globally-inspired fruit snack recipes.
Sweetener Options
When it comes to making the perfect homemade fruit roll-ups, the question of whether or not to add sweeteners often arises. The good news is that your choice depends entirely on the ripeness and natural sugar level of the fruits you use. Understanding how sweeteners affect the texture, flavor, and shelf life of your roll-ups can help you find the ideal balance for your taste.
Why Sugar Affects Texture
Sugar plays an essential role beyond adding sweetness—it’s a texture enhancer. During dehydration, natural and added sugars help retain moisture, giving roll-ups their glossy finish and pliable feel. Too little sugar, and your snack might become dry or brittle; too much, and it can turn overly sticky. The goal is to achieve just enough sweetness to create that perfect chewy consistency without overpowering the fruit’s natural flavor.
Natural Sweetener Alternatives
For those avoiding refined sugar, natural substitutes can do wonders. Honey, maple syrup, and agave nectar are classic options that add depth and subtle caramel notes. If you prefer a low-calorie approach, erythritol or stevia are excellent choices—they sweeten without affecting texture too much. Each brings a unique flavor profile, so a little experimentation goes a long way.
Chef Ruby’s Healthy Swap Box
Chef Ruby’s go-to trick? Skip all added sugars by relying on overripe fruits like bananas or dates. These natural sweeteners not only blend smoothly but also provide extra nutrients like potassium and fiber. A few drops of lemon juice can balance the flavor and enhance brightness. This way, you get a sweet, flexible, and nutrient-packed treat—completely guilt-free.
Equipment & Temperature Control
Perfecting your homemade fruit roll-ups depends just as much on technique as it does on ingredients. The right equipment and temperature control can make the difference between chewy, vibrant roll-ups and ones that are sticky or brittle. Luckily, you don’t need fancy gear—just a little precision and patience.
Essential Tools for Success
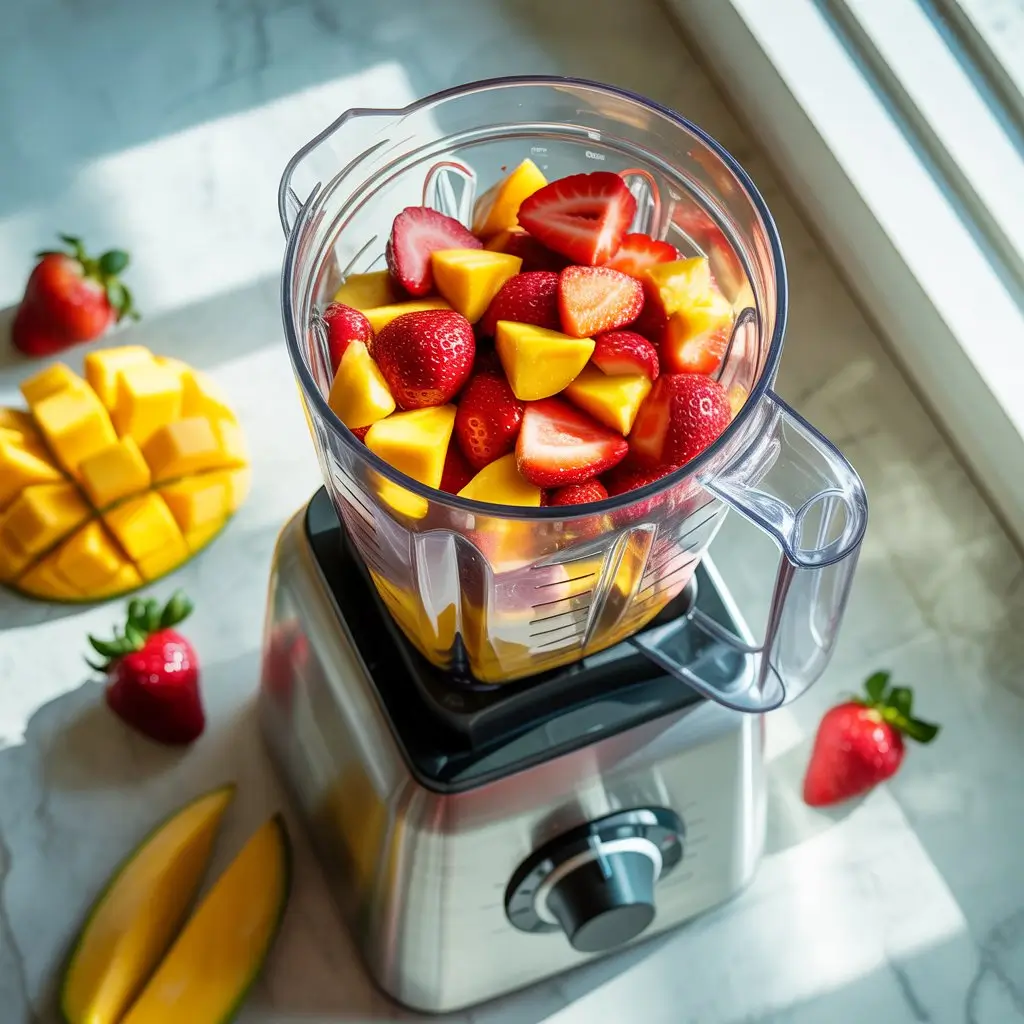
To start, you’ll need a blender or food processor to puree the fruit until it’s perfectly smooth. Next, a baking sheet lined with parchment paper or a silicone mat ensures even drying and prevents sticking. A spatula helps you spread the puree evenly, about 2–3 mm thick. For consistent results, a thermometer is a must—especially if you’re using an oven instead of a dehydrator.
Oven vs. Dehydrator
If you’re using an oven, set it between 150°F and 175°F (65°C–80°C). This low heat gently removes moisture without cooking the fruit. Keep the oven door slightly open using a wooden spoon to let air circulate and prevent steam buildup. A dehydrator offers even more control, maintaining a steady temperature for uniform results. It’s perfect if you make fruit roll-ups often or in larger batches.
Chef Ruby’s Pro Tips
Consistency is key. Spread the puree evenly so it dries at the same rate. Rotate trays halfway through to ensure uniform dehydration. Check periodically by touching the surface—it should feel dry but flexible. The roll-up is ready when it peels cleanly from the mat and bends without cracking.
Step-by-Step Homemade Fruit Roll-Ups Recipe
Now that you’ve got your tools and ingredients ready, it’s time to dive into the process of making homemade fruit roll-ups. Follow these easy, foolproof steps to achieve that perfect chewy texture and natural sweetness every time.
Step 1: Prepare the Fruit Puree
Start with about 3 cups of fresh fruit—strawberries, mangoes, apples, or a mix of your favorites. Wash, peel, and chop them into small pieces. Blend until smooth in a food processor or blender, adding a tablespoon of lemon juice to preserve color and balance sweetness. If your fruit is watery, simmer the puree for 5–10 minutes to reduce moisture.
Step 2: Spread the Puree Evenly
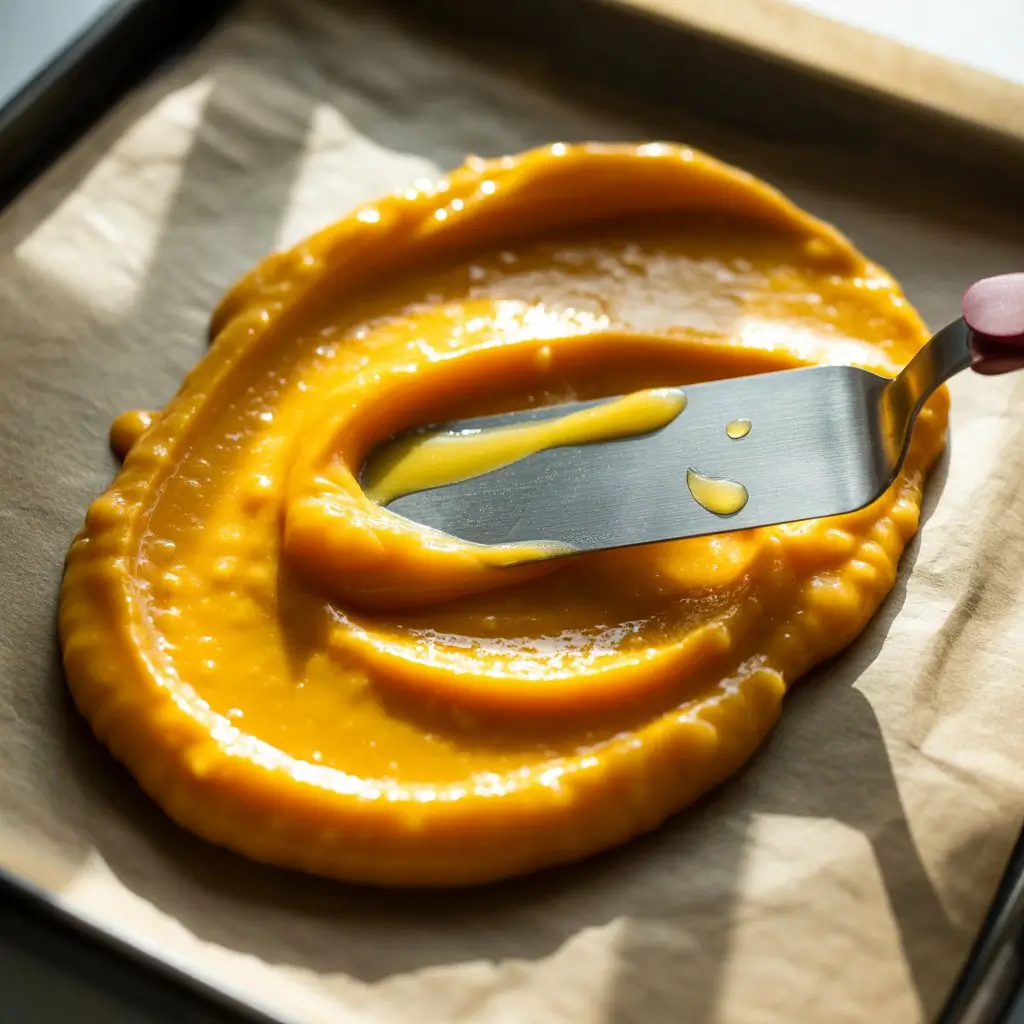
Line a baking tray with parchment paper or a silicone mat. Pour the puree and use a spatula to spread it evenly, about 2–3 mm thick. Consistency is key—thin spots dry faster, leading to uneven texture.
Step 3: Dehydrate Slowly
Set your oven to 150°F (65°C) or use a dehydrator. Let the puree dry for 4–6 hours, checking occasionally. Rotate trays halfway through for even drying. The roll-up is ready when it’s glossy, dry to the touch, but still pliable.
Step 4: Cool, Cut, and Store
Let it cool completely before peeling off the parchment. Cut into strips and roll them up. Store in an airtight container for up to 2 weeks.
Drying & Storage

Perfectly dried homemade fruit roll-ups are the result of patience and precision. Once your fruit puree has transformed into that flexible, glossy sheet, proper drying and storage will ensure they stay delicious for weeks. Whether you plan to enjoy them right away or keep them for later, mastering these final steps makes all the difference.
Testing Moisture Levels
The key to great texture lies in moisture balance. When the roll-up feels slightly tacky but doesn’t stick to your fingers, it’s ready. Over-drying can make it brittle, while under-drying can lead to spoilage. For best results, perform the touch test—gently press the surface; it should feel dry but still bend easily. If you’re unsure, cut a small strip to test flexibility before removing the full batch.
Proper Storage Techniques
Once cooled, carefully peel the roll-up off the parchment. Cut into strips and roll them with fresh parchment or wax paper to prevent sticking. Store them in an airtight jar or container, away from direct sunlight and humidity. In humid climates, consider adding a small desiccant packet to maintain freshness.
Shelf Life and Preservation Tips
Stored properly, homemade fruit roll-ups can last up to two weeks at room temperature or two months in the refrigerator. For long-term storage, you can even vacuum-seal them to lock in flavor and texture. Always check for signs of moisture or mold before consuming.
Learn more about preservation methods in our hand-held snack with dried fruit guide, and explore advanced food storage tips at High Tasty to keep your snacks fresh and flavorful longer.
Nutrition & Health Insights
Behind every delicious batch of homemade fruit roll-ups lies a surprisingly nutritious foundation. Unlike store-bought versions packed with added sugars, artificial dyes, and preservatives, homemade versions retain the fruit’s natural vitamins, fiber, and antioxidants. Understanding what’s really inside helps you appreciate why these chewy snacks can be both indulgent and health-conscious.
Nutritional Breakdown
A serving of homemade fruit roll-ups—about one small strip—contains roughly 50–70 calories, depending on the fruits used. They’re naturally fat-free, rich in vitamin C, potassium, and dietary fiber, and contain slow-digesting carbohydrates that provide lasting energy. Fruits like strawberries and mangoes also supply antioxidants that help fight inflammation and support immune health. If you avoid added sugars, you’re consuming only the natural fructose from whole fruits, making these snacks a smart alternative to candy or processed sweets.
Vitamin Retention During Drying
While some nutrients—like vitamin C—can slightly decrease during dehydration, the process concentrates the remaining vitamins and minerals. This means your roll-ups are nutrient-dense and flavorful without needing additives. Using low heat preserves more vitamins while maintaining texture and color.
Are Homemade Fruit Roll-Ups Healthy?
Absolutely—when made from real fruit and dried properly. They make a great post-workout snack, lunchbox addition, or sweet craving fix without refined sugar. As Chef Ruby says, “These roll-ups are nature’s candy—simple, colorful, and full of goodness.” Enjoy them as part of a balanced diet, and you’ll satisfy your sweet tooth while nourishing your body.
Cost & Efficiency
Making your own homemade fruit roll-ups isn’t just about eating healthier—it’s also surprisingly economical. Compared to store-bought versions that can cost several dollars for a small pack, homemade roll-ups give you more flavor, more nutrition, and far better value. Chef Ruby’s approach focuses on using affordable ingredients and smart kitchen habits to stretch your budget without sacrificing taste.
Cost Comparison
On average, a batch of homemade fruit roll-ups costs around $3–$4 using about 3 cups of fresh fruit, producing up to 10 servings. In contrast, a store-bought box of similar snacks can cost nearly the same but provide only a fraction of the quality and nutrition. Buying fruits in season or frozen varieties in bulk can reduce your costs even more while keeping the flavor vibrant. Plus, there’s no packaging waste—making it both eco-friendly and wallet-friendly.
Energy and Time Efficiency
Although dehydration takes several hours, most of that time is hands-off. Once the puree is in the oven or dehydrator, you can move on with your day. To make the most of your energy use, Chef Ruby recommends drying multiple trays at once if your oven allows. This simple step lets you prepare several batches with minimal effort and energy consumption.
Chef Ruby’s Money-Saving Tip
Turn fruit that’s slightly overripe into puree instead of tossing it away. It’s naturally sweeter and perfect for roll-ups. You’ll reduce food waste and save money at the same time.
Learn more about seasonal fruit choices in our fruit for snacks guide, and find budget-friendly meal prep inspiration at High Tasty.
Creative Variants & Uses
One of the best things about homemade fruit roll-ups is their versatility. Once you’ve mastered the basics, the possibilities for customization are endless. From colorful combinations to functional add-ins, you can transform this simple snack into something truly special.
Fun Flavor Variants
Get creative by layering purees of different fruits—like strawberry and mango for a tropical burst or blueberry and apple for a tangy twist. You can even swirl two flavors together before drying to create a marbled look that’s as beautiful as it is tasty.
Add-Ons for a Nutritional Boost
Enhance your roll-ups by adding chia seeds, spirulina, or a touch of collagen powder to the puree before drying. These superfood ingredients increase nutritional value without affecting the flavor.
Creative Serving Ideas
Cut roll-ups into small hearts or stars for lunchboxes, or use them as natural cake decorations. They also make great energy snacks for hiking or workout sessions.
FAQs About Homemade Fruit Roll-Ups
1. Are homemade fruit roll-ups healthy?

Yes. When made from 100% fruit, they retain vitamins, fiber, and antioxidants. The Harvard T.H. Chan School of Public Health notes that whole fruits offer essential nutrients without excess sugar HARVARD .
2. How do you store them to keep them fresh?

Store them in an airtight container for up to two weeks or refrigerate for longer. The USDA recommends airtight packaging for extending the shelf life of dried foods (USDA).
3. Can I make fruit roll-ups without sugar?

Fruits high in pectin—like apples, strawberries, and plums—offer the best texture. A Springer study confirmed their superior structure during drying The Mayo Clinic.
4. What fruits work best for roll-ups?

Fruits high in pectin—like apples, strawberries, and plums—offer the best texture. A Springer study confirmed their superior structure during drying Springer study.
PART 12: Chef Ruby’s Story
For Chef Ruby, homemade fruit roll-ups are more than a recipe—they’re a piece of her childhood. She recalls standing in her grandmother’s kitchen, watching fresh fruit puree spread thin on parchment, filling the air with the scent of strawberries. “That smell still reminds me of home,” she says.
Over time, that simple family tradition became a passion. Today, Chef Ruby shares her love for turning real fruit into wholesome snacks that celebrate flavor and simplicity. Her philosophy? “Good food doesn’t need to be fancy—just made with care and real ingredients.”
For Ruby, every batch of fruit roll-ups preserves a taste of summer and the joy of slowing down to make something by hand.
Discover more of Chef Ruby’s fruit-inspired creations at Zestolla and find creative kitchen ideas on pinterest.